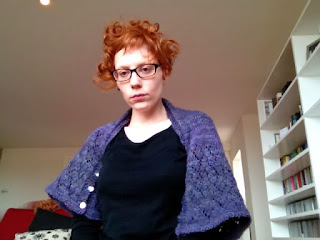
My beautiful shapeshifter shrug, the reason I bought the Vampire Knits book in the first place, is complete. What attracted me to this was the idea that it is versatile, so if one day you fancied wearing it as a scarf you could, and then the other day you could switch to wearing it as a shrug.
I bought the yarn (Colinette Art) at the knitting fair in Ali Pally a few months back - I was attracted to the colour of course and also the softness, as it is a mixture of wool and bamboo. As usual, my stinginess meant that I did not buy enough yarn to make this as big as it was supposed to be; my two skeins were way under the recommended yardage (I have no idea why at the time I thought it would work). So, instead of casting on 96 stitches I cast on 80 (I had to work out how many repeats of the pattern there are to subtract a few and still make sure that I had an appropriate number of stitches). My reasoning for doing that was that I would rather it were longer than wider. The fact that it is worked in two halves was to my favour, so I just knitted each half until the skein ran out. It ended up being about 20 inches after two rounds of blocking, which comes up to around my elbows.
Ok here are the terrible pics as demonstration (this is what happens when you use an iPad to take photos...).
Here it is with the buttons folded, when it can be used as a scarf. I don't think the colours have come out as beautiful as they really are in this picture. The edges are based on the lace pattern, which is annoyingly different for each row and thus requires quite a bit of concentration! (but always more fun than boring stockinette)
The most obvious choice (and annoying the only one demonstrated in the book) is to wear it as a shrug by buttoning up some of the buttons.
Alternatively, you can keep your shoulders warm but using it as a shawl. Some 'illegal' buttoning (or maybe a broach) will also allow you to wear it as a capelet
If you prefer thinner scarves you can also wear it at its max width, wrapping around and then just buttoning a couple of the buttons to keep in place. I think this is likely to be the way I will use it the most, as the lace is also nicely on display. There are also a few different ways of doing that to get different effects.
(Obligatory vintage-looking photo)
There was one option that I really fancied, which was to wear it as a hood/neckwarmer (spotted in a very helpful blog post). However, mine is not wide enough for that, so if you also like that option you better follow the instructions (something I am clearly not very good at).
As an aside, I made the buttonholes go over 2 stitches rather than 3 as instructed, because my buttons were a bit smaller. However, I am not very happy with them, already they feel a bit stretched out, and some of the buttons just pop out. So next time I make something with proper buttonholes (rather than my usual improved 'illegal' buttoning), I will need to do some research on the best method (if anyone knows of any please let me know).
Time to start the next project!


mi piace molto come scaldacollo :)ciao
ReplyDeleteRosy
Grazie!
ReplyDelete