Showing posts with label headband. Show all posts

Tuesday, 17 March 2015

Fun times with arm knitting

I have been silent but not lazy in the crafts department, in fact I have had so many projects on the go, I have now lost track of what I need to write about! But I thought I'd start with my latest discovery, arm knitting.

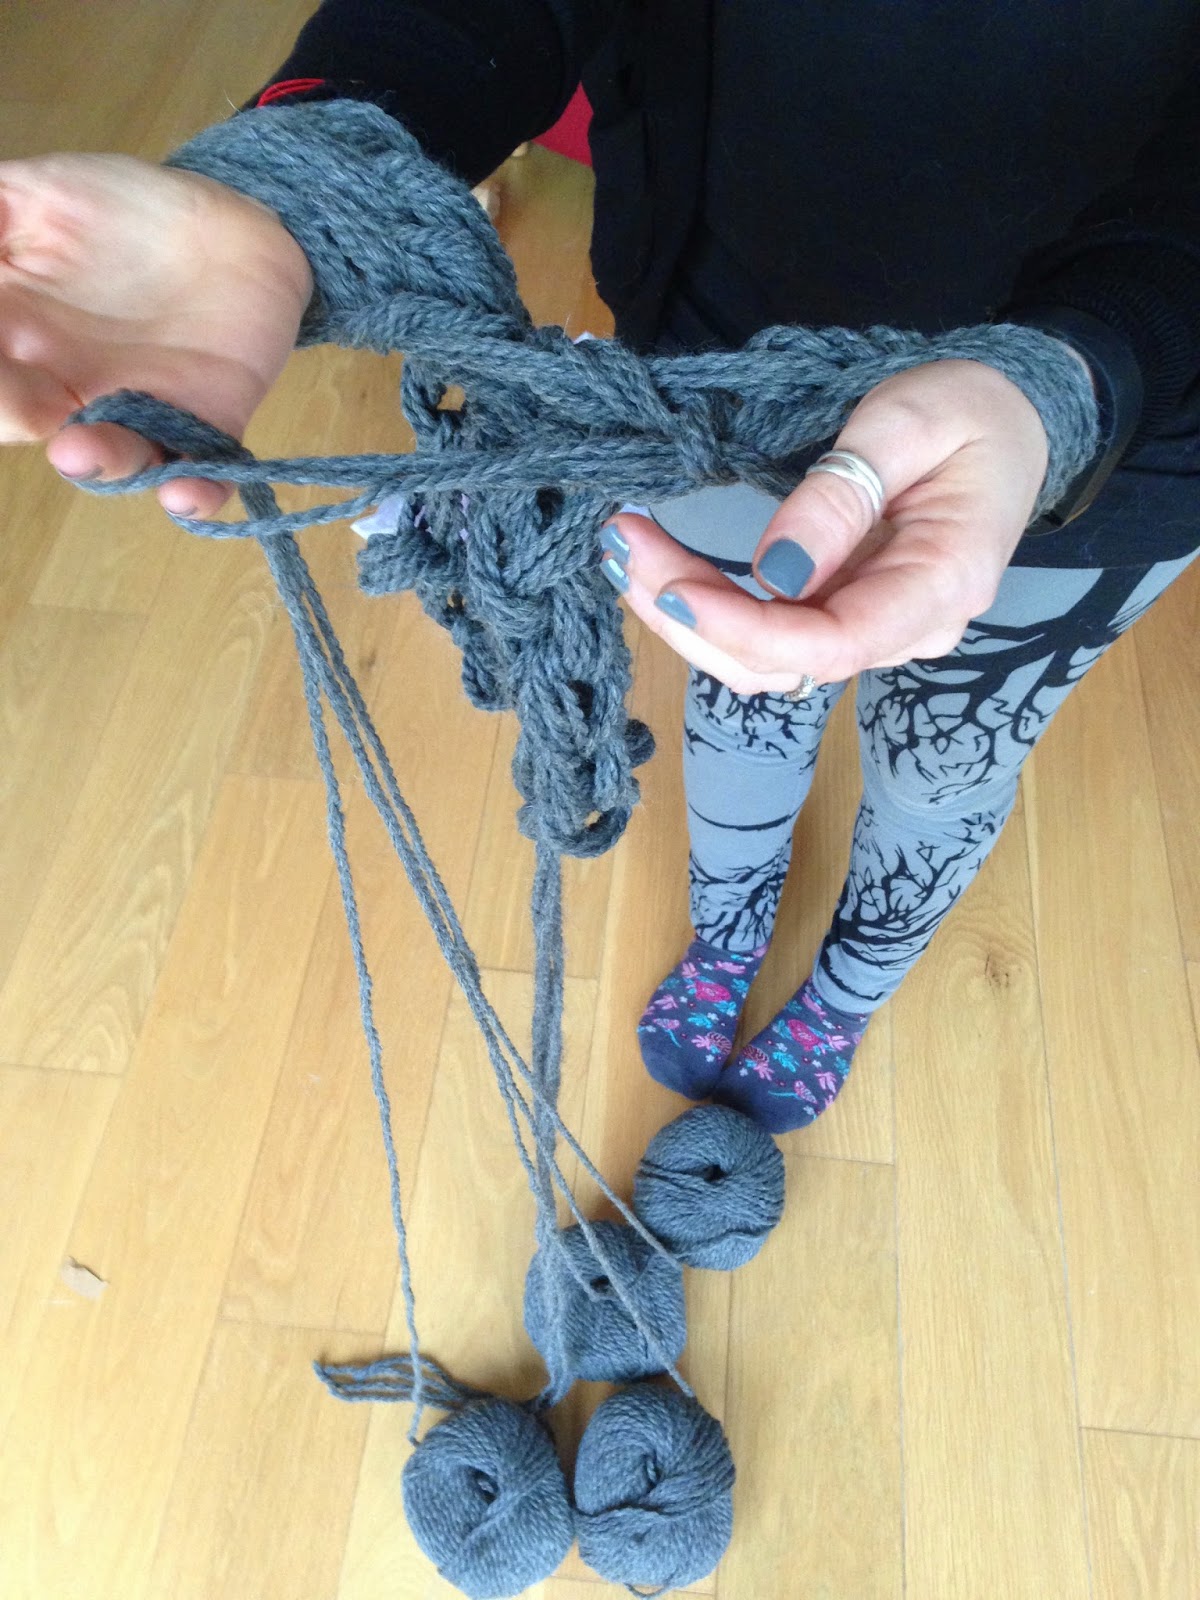
Yes, I know, arm knitting is so 2014, I am totally late in the game. I randomly came across it through another blog (knitted bliss), and being my usual shopping-impulsive self, I bought the latest (and apparently most comprehensive) book on arm knitting. The idea is essentially what the name suggests: knitting using your arms instead of needles to create a rather open fabric, mainly using bulky or super bulky yarn. Other than just liking the look of this open fabric, the appeal here is that you can knit stuff insanely quickly, which is an excellent skill to have for all those last minute presents.

The book has a range of projects, some better than others (the beanie hat is a little weird and unattractive, for example), and detailed instructions on how to arm (and finger) knit - although I will admit that, as usual, I needed the visual help of youtube to fully understand what was happening.


Being, again, shopping-impulsive, I bought a ton of chunky yarn to make the vest that is on the cover of the book. And I made it, and it looked nothing like the pictures, nothing, it was a hideous mess of holes. I am not entirely sure where I went wrong, but it was a disaster. So instead, I decided to try the cowl (and there are tons of free patterns on the internet if you want to try this). It took around 30 minutes. If you are one of the people I make gifts for for Christmas, you might well be getting this next year!


I also tried finger knitting, which, again, as the name suggests, involves using your fingers (sometimes 3, sometimes 4, depending on the width of the project) to knit a fabric that looks a little like an open I-cord. This was a lot more straightforward that arm knitting (no youtube help required), and gave me a matching headband to my cowl in about 20 minutes (again, be warned, this may be coming your way!).


Anyway, its definitely worth exploring this if you haven't yet by trying out one of the free cowl patterns on the internet, and the book might be an investment if you think you might want to try a few more things. 

Saturday, 5 April 2014

A knitting owlette original - the maymay headband

Since I started knitting, like most people I have followed patterns, seeking inspiration through the many pages on ravelry. I have modified patterns to better suit my tastes or needs, but that's where it ended. But the other day I thought: why not try to design some of my own?

Given my headband obsession, it seemed fitting to start there, and so I present the maymay headband. This cute little accessory (which is a little weather-inappropriate in the UK at the moment) will keep your ears warm and not mess up your hair. It is based on the xoxo honeycomb pattern, surrounded by 3 rows of 2x2 rib to provide elasticity. 

If you are wondering about the name, it is named after the phrase for I love you in Furbish - yes, Furbish (remember Furbies from the late 90s?). Given that the pattern is xoxo (ie hugs and kisses) and that I made it for my friend Kathryn who I used to use the phrase with, it just seemed right! 

Materials
5mm circular needles, cable needle
Yarn: Manos de Uruguay wool classica (or other similar aran-weight yarn)

Gauge
I had some trouble calculating this (first time and all) but the gauge will not be massively important unless you are way off
13 stitches in xoxo honeycomb pattern= 2 inches

Abbreviations
k: knit
p: purl
c4b: place 2 stitches on cable needle and hold to the back, knit the next 2 stitches and then knit the stitches on the cable needle
c4f: place 2 stitches on cable needle and hold to the front, knit the next 2 stitches and then knit the stitches on the cable needle

Pattern
Cast on 90 stitches and join in the round, being careful not to twist
Row 1: *k2 p2*, repeat until last 2 stitches, k2
Rows 2,3: repeat row 1
Rows 4, 5: k across
Row 6: k *c4f c4b c4b c4f* repeat from * until last 5 stitches, c4f c4b k
Rows 7, 8, 9: k across
Row 10: k *c4b c4f c4f c4b* repeat from * until last 5 stitches, c4b c4f k
Row 11: k across
Repeat rows 4-11 once more
Next 3 rows: repeat rows 1-3 once more
Bind off loosely, hide the loose ends and block lightly

That's it! Pretty simple but gives a very interesting cable that looks like XO.

XO or hourglass I guess?


I tried to write everything out as detailed as possible, but I have missed anything please let me know so that I can bear in mind for next time or modify this pattern. I have also added it on ravelry.


Monday, 11 November 2013

Christmas knitathon continues - Growing leaves cowl; braided headband

My Christmas knitting progress has been slow, with family and friends visiting and an insane business trip during which I got maybe a total 12 hours sleep in 3 days (don't ask, I survived just about despite my old, I swear it was easier to go without sleep when I was a student). However, I have managed to knit two more gifts, hoorah! (Although, another four to go, and at this rate I predict another frantic December knitathon).


The first is the Growing leaves cowl, which I made for my 'mother-in-law'. I have never knitted anything for her before, and I am not entirely sure she even likes cowls, but I decided that it might be nice to make something for her, given how generous she was with my gift last year (the DK alpaca yarn and Domiknitrix pattern book), and my total failure to finish the jumper knitted with said gift (hence having no evidence that I enjoyed the gift).

I had the pattern saved in my Ravelry library (although I have no recollection of ever seeing it before), and I thought it looked pretty and cozy for when it gets even colder. It has everything I could ever ask for from a pattern: knit in the round, lace that is simple enough to remember but enough to make the knit more interesting than boring stockinette, and bulky yarn for a speedy knit. Also, no mods necessary, although I did make a teeny mistake towards the end, with the last leaf, but I don't think its noticeable.

For the time being, I have decided not to block it, as I think  it actually looks better with the '3D' leaves than it might look if the lace were flattened. The lack of blocking also means that it is cosier, perfect for those cold winter mornings.


Detailed view of the lace


Another bad selfie with minimal lighting

At least with a cowl I can hide!


The second gift is the Braided headband, which is supposed to be a rip-off of an Anthropologie headband (and incidentally I think the headband that the friend for whom I made the Vanessa headband wore all of last winter, maybe I need to re-think which one I give to each friend). I actually found a few patterns that aimed to emulate the Anthropologie headband, but this seemed to be the most straight-forward, as it is basically just a very wide cable knit over 16 stitches.

Once again, bulky yarn and fairly small project made for a speedy knit, and a very happy knitter (despite the need to do a bit of sewing; this is knitted flat rather than in the round). The only mod was to knit using 8mm needles rather than 9mm ones, which I don't have (and I keep forgetting to buy). I also did not block this one to avoid flattening out the cable and destroying the braided effect.

Here it is worn

And close-up

Both were knitted with James C. Brett chunky with merino (bought at the Knit and Stitch show), and one skein (100g) was enough with a tiny bit of leftovers (yay for no wastage!). Although for the cowl I think it would be worth using a more luxurious yarn.

Ravelry links: Leafy; Braided


Saturday, 19 October 2013

The Christmas knitathon begins - Vanessa headband

Last weekend was London's Knit and Stitch show - if you have never been to one, I thoroughly recommend it, for the atmosphere, bargains and the vast array of yarns that you have probably never heard of before (yarn from camel anyone?). I spent another crazy day walking , being totally overwhelmed by choice despite my promising myself that I would be decisive this year! That plan of course went totally out of the window, and I wandered around for 4 hours, grabbing bargains and luxury delights left and right (as well as the occasional non-craft-related item).


So, like last year, this marked the time to get a start on some Christmas knitting. Although I have decided to make fewer presents this year, I thought it would be good to at least get a few done early to avoid the mad rush in December, and also to lift my knitting spirits, which have been destroyed by my inability to finish the sweetheart sweater (it has not been touched since I last blogged, obviously intarsia is proving to be some sort of nemesis for me).

First, I decided to work on the Vanessa headband, for a friend who wore a very similar one all of last winter - need to give the girl some choice! This headband comes in two widths and has a wide cable running through it that I think makes it look really pretty. It is knitted with bulky yarn and 8mm needles, so a very fast knit indeed, especially if you choose to go for the narrow version.


Apologies for the colour, the sun has left the country
And here is a close up
 The yarn is Mirasol Kutama (naturally bought at the Knit and Stitch show), and I think you will agree is a beautiful bright blue, even if my crappy pictures don't capture the colour very well. It is 100% wool but very soft, and was nice to work with, ie not too unwindy or sheddy. I wish I had bought more of it to be honest as it was a bargain! The narrow version of the headband used around 30g of yarn, so there is a little left that could be potentially combined with some of my numerous scraps to make another headband.

I also made another High-street cap - being such a fast knit and using so little yarn makes it the perfect gift. The yarn here is James Brett Chunky with merino (a brand I have only ever seen at the Knit and Stitch show) and is a very decent wool mix. In fact I bought it last year to make a bow scarf for the recipient, so now she will have a matching hat.

Just as a note, I decided to knit the first pattern repeat with 6mm needles to make sure that the hat sits a little more tightly on the head, switching to 8mm needles for the body. And did an additional pattern repeat, so now it does cover the ears more. I am much happier with this one than the one I made for myself, but I guess this is why it is usually good to experiment with a pattern before making one as a gift!


Friday, 22 February 2013

Crochet bow headband

Procrastination continues, this time in the form of a crochet headband. This is based loosely on the construction of the knitted one I made last time, which I thought was pretty clever.

The idea was that it might be handy to have a cotton one that is much thinner than the knitted one I made before to keep my hair in control when the weather is warm. I was probably a little spurred on by the fact that I am going on holiday to Peru (yay!) very very soon. I figured that a crochet version would be much much faster to make than another knitted one, so I decided to have a stab at designing one myself. I tried a few ways of doing it and this was the best and easiest one. This is obviously very very basic, as I haven't quite ventured into the designing world yet. So bear with me if the instructions are crap.

Yarn: (I think) Pattons cotton DK
Hook: 4mm

First, ch10, then hdc on the second chain from the hook and across - 8hdc
For the next row, chain hdc across, and continue until the headband is the desired size (mine was 56 rows). At that point, join the two edges together using slip stitch. You can obviously stop here for a plain one.
For the flap of the bow, turn and hdc along the next 5 stitches, turn, hdc on the same stitch and across (5 stitches). Continue for 10 rows. Cut the yarn, leaving quite a long tail, and secure the last stitch on the hook.
For the bow itself, ch8, turn and sc across (8sc). Continue for 17 rows, and then cut the yarn, securing the final stitch.
Place the bow on the headband so that the flap runs across its middle, then turn the flap under the headband and then over the bow. Line up with the edge of the bow and of the headband and sew it on. If this makes no sense whatsoever, have a look at the pattern for the seedy bow headband, she had helpful pictures showing how to do this.

Hard to tell with black yarn, sorry!


Thursday, 14 February 2013

Seedy bow headband

I have been procrastinating starting my next big project because it involves learning and practicing intarsia beforehand. So instead I decided to make another headband, the seedy bow headband (can also be found here).

Headbands have been very popular in the past couple of years, and they are great little projects to work on: they are very fast and take very little yarn (I have only ever made them using scraps). And I find that they are better than hats at keeping your ears warm, plus they don't squash your hair as much, which is a bonus.

I made this using leftovers from a hat I made as a gift over Christmas. As an aside, I didn't really like this yarn (James Brett monsoon; bought at the Ali Pally knitting fair again): although the colours are pretty and it is very soft, it is fuzzy, not tightly wound and had random furry bits and thin bits scatted throughout. The pattern is very very simple (for a beginner knitter really!), although I find seed stitch quite dull. I modified it slightly, by casting on 85 stitches, knitting 3" for the main band, and then casting on 25 stitches for the bow and knitting 2".


So if you have some scraps left over from a bigger project, why not have a look at ravelry for some headband ideas?