Friday, 22 February 2013

Crochet bow headband

Procrastination continues, this time in the form of a crochet headband. This is based loosely on the construction of the knitted one I made last time, which I thought was pretty clever.

The idea was that it might be handy to have a cotton one that is much thinner than the knitted one I made before to keep my hair in control when the weather is warm. I was probably a little spurred on by the fact that I am going on holiday to Peru (yay!) very very soon. I figured that a crochet version would be much much faster to make than another knitted one, so I decided to have a stab at designing one myself. I tried a few ways of doing it and this was the best and easiest one. This is obviously very very basic, as I haven't quite ventured into the designing world yet. So bear with me if the instructions are crap.

Yarn: (I think) Pattons cotton DK
Hook: 4mm

First, ch10, then hdc on the second chain from the hook and across - 8hdc
For the next row, chain hdc across, and continue until the headband is the desired size (mine was 56 rows). At that point, join the two edges together using slip stitch. You can obviously stop here for a plain one.
For the flap of the bow, turn and hdc along the next 5 stitches, turn, hdc on the same stitch and across (5 stitches). Continue for 10 rows. Cut the yarn, leaving quite a long tail, and secure the last stitch on the hook.
For the bow itself, ch8, turn and sc across (8sc). Continue for 17 rows, and then cut the yarn, securing the final stitch.
Place the bow on the headband so that the flap runs across its middle, then turn the flap under the headband and then over the bow. Line up with the edge of the bow and of the headband and sew it on. If this makes no sense whatsoever, have a look at the pattern for the seedy bow headband, she had helpful pictures showing how to do this.

Hard to tell with black yarn, sorry!


Saturday, 16 February 2013

Whole orange chocolate cake

I finally got round to making this no butter, no flour whole orange cake. The idea is basically boiling an orange pretty much to death, and this, together with the ground almonds (which substitute the flour), provide the moisture to the cake. The 6 eggs (!) possibly have something to do with this too. 

This is apparently a Nigella recipe from her book Feast. As it has been published in about a billion places online already I don't feel so bad about posting parts of the recipe here (as an FYI I got it from here).

You will need:
1 large orange
6 eggs
1 teaspoon baking powder
1/2 teaspoon bicarbonate of soda
200 gr ground almonds
250 gr caster sugar
50 gr cocoa


First you boil the orange for about 2 hours. I'd suggest putting a lid on the pan as the whole kitchen filled with steam and stained our ceiling. Then drain the orange and blend it. I actually did this 2 days in advance and stored it in the fridge.


Then add the rest of the ingredients and mix them (I used an electric hand mixer) until you get a good cake mix consistency. The mix makes more than what you can fit in one loaf tin, so I had to pour some of it in a second tin - I guess about 2/3 of recipe makes enough for a regular loaf tin. Then bake at 180 degrees C. The recipe says to bake for an hour - I took my small cake out after  30 min and the big one after 45 minutes because it had started to burn. Perhaps the 180 degrees is for a non-fan oven?

The one in the front is the mini one (ie thin one) and the one in the back is the proper one, which caught a bit on the top
The cake was absolutely delicious, it is very light (probably because of the absence of butter) and very juicy from the fruit. I liked it so much I am having trouble not eating the whole thing in one sitting! 

Thursday, 14 February 2013

Seedy bow headband

I have been procrastinating starting my next big project because it involves learning and practicing intarsia beforehand. So instead I decided to make another headband, the seedy bow headband (can also be found here).

Headbands have been very popular in the past couple of years, and they are great little projects to work on: they are very fast and take very little yarn (I have only ever made them using scraps). And I find that they are better than hats at keeping your ears warm, plus they don't squash your hair as much, which is a bonus.

I made this using leftovers from a hat I made as a gift over Christmas. As an aside, I didn't really like this yarn (James Brett monsoon; bought at the Ali Pally knitting fair again): although the colours are pretty and it is very soft, it is fuzzy, not tightly wound and had random furry bits and thin bits scatted throughout. The pattern is very very simple (for a beginner knitter really!), although I find seed stitch quite dull. I modified it slightly, by casting on 85 stitches, knitting 3" for the main band, and then casting on 25 stitches for the bow and knitting 2".


So if you have some scraps left over from a bigger project, why not have a look at ravelry for some headband ideas?


Saturday, 9 February 2013

Granola chocolate chip cookies

I had planned to go for another low-fat recipe for this week's bake. However, I was a little short of time for a cake - some friends were coming over to our neighbourhood for lunch and I wanted to quickly prepare something in case we decided to come back to ours for coffee (you should always have something at home to give to guests, rights?). I was tempted to go for the peanut butter choc chip cookies from the Primrose bakery cookbook because I have made them before and they are truly yummy, but in the spirit of being adventurous I decided to try the granola white choc chip cookies instead (from the same book).

I have wanted to try these for a while, but granola is not cheap, and somehow it felt like a bit of a waste to use it for cookies. The book suggests making your own and includes a recipe for this, but I still haven't gotten round to that (will certainly write about it if I do anyway). So I bought probably one of the cheapest boxes of granola I could find that still looked pretty tasty (in case I wanted to eat it for breakfast) and came in one of my favourite flavours - apple and cinnamon. I really dislike white chocolate (its not chocolate, its sugar!) so instead I used some regular chocolate chips, but not that many so as to not overpower the granola flavours. The recipe also calls for almonds, which I did not include.


(I quick clearly need to start taking better pictures!). 

Ok they do look a bit wonky, but I was in a rush so I basically just dumped a spoonful of dough on the baking sheet rather than make nice symmetrical cookie balls. They also look a bit paler than I expected - I contemplated leaving them in for longer than the recommended 10 minutes, but then you run the risk of them drying up.

Verdict: I thought they were pretty tasty and the right level of chewiness, with a good crunch  and a nice cinnamon-y flavour from the granola. Next time I would probably either opt for a plainer granola and add more choc chips (or maybe just oats, that's a classic too although you lose the crunch ), or omit the choc chips and use a tasty granola like this one. 

PS. I debating whether it was ok to post my 'adapted' recipe here. I read through some articles about the rules of copyright and recipe re-posting.  Although technically what I made is sufficiently different from the recipe in the book, I feel that it is a bit wrong to republish something that is not freely available without permission (my line of work has probably instilled some copyright guilt in me...). At least for now anyway.


Friday, 8 February 2013

Shapeshifter shrug: fin

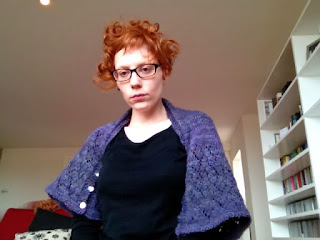
My beautiful shapeshifter shrug, the reason I bought the Vampire Knits book in the first place, is complete. What attracted me to this was the idea that it is versatile, so if one day you fancied wearing it as a scarf you could, and then the other day you could switch to wearing it as a shrug.

I bought the yarn (Colinette Art) at the knitting fair in Ali Pally a few months back - I was attracted to the colour of course and also the softness, as it is a mixture of wool and bamboo. As usual, my stinginess meant that I did not buy enough yarn to make this as big as it was supposed to be; my two skeins were way under the recommended yardage (I have no idea why at the time I thought it would work). So, instead of casting on 96 stitches I cast on 80 (I had to work out how many repeats of the pattern there are to subtract a few and still make sure that I had an appropriate number of stitches). My reasoning for doing that was that I would rather it were longer than wider. The fact that it is worked in two halves was to my favour, so I just knitted each half until the skein ran out. It ended up being about 20 inches after two rounds of blocking, which comes up to around my elbows.

Ok here are the terrible pics as demonstration (this is what happens when you use an iPad to take photos...).

Here it is with the buttons folded, when it can be used as a scarf. I don't think the colours have come out as beautiful as they really are in this picture. The edges are based on the lace pattern, which is annoyingly different for each row and thus requires quite a bit of concentration! (but always more fun than boring stockinette)


The most obvious choice (and annoying the only one demonstrated in the book) is to wear it as a shrug by buttoning up some of the buttons.


Alternatively, you can keep your shoulders warm but using it as a shawl. Some 'illegal' buttoning (or maybe a broach) will also allow you to wear it as a capelet


If you prefer thinner scarves you can also wear it at its max width, wrapping around and then just buttoning a couple of the buttons to keep in place. I think this is likely to be the way I will use it the most, as the lace is also nicely on display. There are also a few different ways of doing that to get different effects. 


(Obligatory vintage-looking photo)


There was one option that I really fancied, which was to wear it as a hood/neckwarmer (spotted in a very helpful blog post). However, mine is not wide enough for that, so if you also like that option you better follow the instructions (something I am clearly not very good at).

As an aside, I made the buttonholes go over 2 stitches rather than 3 as instructed, because my buttons were a bit smaller. However, I am not very happy with them, already they feel a bit stretched out, and some of the buttons just pop out. So next time I make something with proper buttonholes (rather than my usual improved 'illegal' buttoning), I will need to do some research on the best method (if anyone knows of any please let me know). 

Time to start the next project! 


Monday, 4 February 2013

Low-fat cake?

That's absurd, right!? I have been trying to bake something every week in an effort to get better at it, but this does not work well with the post-holiday, post-diet weight gain. While on a diet last year I stumbled upon a recipe for a cake with no butter, just yoghurt, so I thought I would give it another go.
I based it on this recipe  for orange and yoghurt cake, but I decided to try lemon and poppy seed instead.

I used:
170g total 0% greek yoghurt (ie one small tin)
2 tablespoons extra virgin olive oil (I think that's 30ml?)
Zest and juice of 1 lemon (although in hindsight 2 lemons would have been better).
3 eggs
200g plain flour
1tsp baking powder
Poppy seeds (didn't measure, just stirred in until the distribution looked right).

Then followed the instructions as per the recipe above (ie whip eggs, yoghurt, oil, lemon zest, then add dry ingredients and mix some more before adding the poppy seeds and lemon juice). One thing that always annoys me with cake recipes is if the instructions don't specify fan on non-fan over. In this case I assumed it meant non-fan so baked at 160 degrees for 45 min, and then I think another 10 minutes until the tester came out dry. Pressumably the extra baking time was because the recipe did mean fan oven... I may have been better off taking it out a little earlier too.

Anyway, apart from a slight overwhipping of the eggs it turned out good, and as you can see we already ate half of it! So I guess it is possible to make a slightly low fat cake that tastes good

Sunday, 3 February 2013

Intro


I had a blog a few years ago, which I abandoned because I wasn’t sure there was a point in having one if you don’t have anything special to say. Anyway, here’s giving it another go.  I kind of decided that if no one reads it it doesn’t matter, it will just serve as a diary for me :)
Just as an indication of what I’m interested in, I have almost finished the shape shifter shrug from the “vampire knits” books. Here is the Ravelry link for those who are on it (and if you are knitter you really should be!)
And here is the second half blocking on my old yoga mat under some cookbooks.

And here is a close-up of the first half.


I just need to stitch them together and the stitch the buttons on. Can’t wait for it to dry!